When manufacturing cylindrical CNC milled parts, concentricity is the unit of measure of part accuracy. Concentricity, is the degree to which the inner diameter of the insert is offset from the center of the entire circle. Ideally it is 0, meaning no offset. But in practice there is an offset. General single-molded PC concentricity of 1.0 or less, is considered a better product. Definition of concentricity: concentricity is a positional constraint on the diameter of the rotating body of the point elements relative to the center of the reference element. First of all, it needs to be clear that concentricity is a positioning tolerance rather than directional tolerance, specifically, it is the positional relationship of the axis or center of a circle of a rotating body relative to the datum center element, and its tolerance zone is to take the datum center axis as the center of the tolerance zone, and to make a circle/cylinder with the tolerance value as the diameter, and the concentricity/concentricity of the element being measured is qualified when the center/axis of the element being tested is within the circle/cylindrical surface.
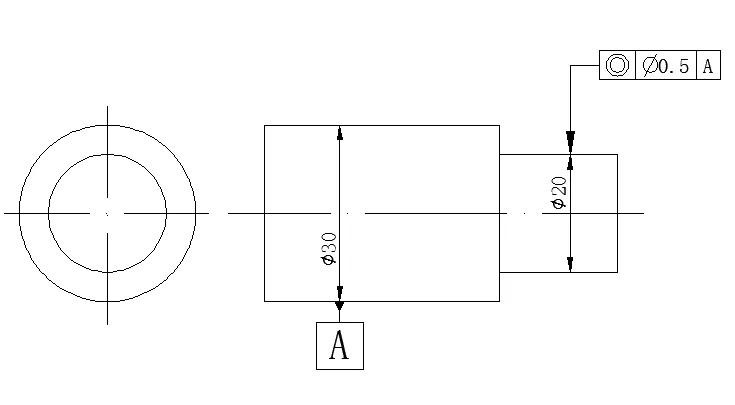
The figure indicates that the coaxiality tolerance of Φ20 cylinder relative to Φ30 cylinder is Φ0.5, and the tolerance zone is shown below:
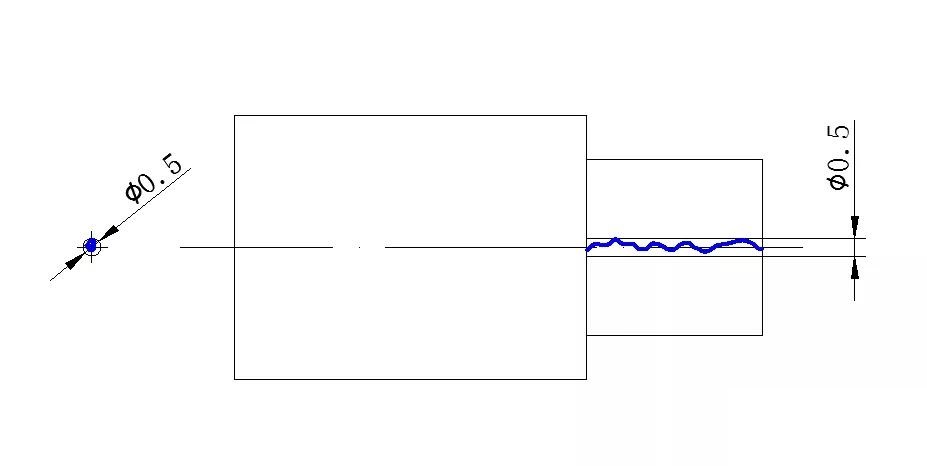
The axis of Φ30 cylinder is simulated to a theoretical axis, i.e., the straightness of the axis of the reference axis is zero, and then the axis of this theoretical axis is used as the axis line to make a cylindrical surface within the length of Φ20 cylinder, the diameter of the cylindrical surface is Φ0.5. As long as all the points on the axis of the tested Φ20 cylinder fall within the Φ0.5 cylindrical surface, then the coaxiality of the tested cylinder is qualified.
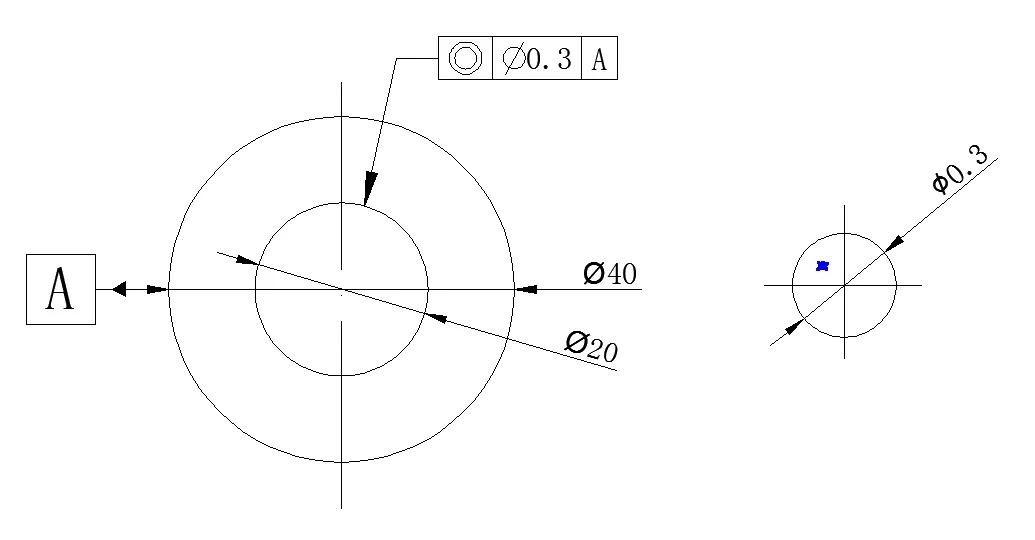
Concentricity, on the other hand, is qualified as long as the positional relationship between the center of the circle and the datum is taken into account, which means that the center of the circle on a certain cross-section of the cylinder should fall within the circle with the center of the datum as the center, and the concentricity tolerance value as the diameter, then the concentricity is qualified.
Concentricity / coaxiality constraint is the position of the axis or center of the circle relative to the benchmark axis (axis) of the position of the relationship, and a circle (cylinder) of the center (axis) and the diameter has no relevance, regardless of the diameter of the larger or smaller, the center of the circle (axis) position will not correspond to the change, so concentricity / coaxiality tolerance can not be used in the entity conditions for the correction, regardless of whether the measured elements or benchmarks are not applicable.
In the actual use of the part, the assembly relationship of this step shaft (hole) is again related to the diameter, if you need to relate the cylindrical diameter and the positional relationship of the two cylinders, you can not use the coaxiality, you need to use the degree of position, the degree of position can be used to use the entity conditions, datum and measured elements are applicable. In general, all coaxiality can be equivalently replaced by positionality, because the tolerance zones of coaxiality and positionality are then identical. However, for the evaluation of the positional relationship between two coaxials, the coaxiality evaluation method is more intuitive, the positional degree is the positional relationship, after all, all elements can have positional constraints. When evaluating the relative positional relationship between two coaxial elements, it is recommended to use the coaxiality tolerance.
So is it that coaxiality is useless? The answer is no. Slewing body will generally consider the balance of rotation, so as to ensure that in the process of rotation, the slewing body's own rotation is very small, the transfer of energy loss is reduced, but also to reduce the noise generated in the process of rotation, but also to ensure that the service life of the slewing body and so on. Coaxiality is an important control tolerance, he ensures the uniformity of the mass distribution of the rotary body. Speaking of rotary body, the use of more is jumping, but jumping control is the surface elements relative to the center axis elements of the position of the relationship, and can not be as coaxial as intuitively reflect the distribution of rotary body quality, which is the coaxial degree of the relative advantages of jumping place.
Coaxiality control is the position of the axis of the relationship, and the axis can not be obtained directly through the measurement, the need to get the center of the circle according to the surface of the circle to the center of the position, the use of conventional testing equipment is difficult to get, usually using computer-aided calculations, such as the three-coordinate measuring machine, it is very easy to get the coaxiality of the measured value.
Coaxiality also has limitations of use. When the constraint element is the positional relationship of the axis relative to the reference axis, and the need to use the entity condition correction, the recommended use of positional tolerance; when the constraint is the positional relationship of the surface elements relative to the reference axis, the recommended use of runout tolerance; when the constraint is the size, shape, direction, position of the surface relative to the positional relationship of the reference elements, the recommended use of contour degree tolerance.
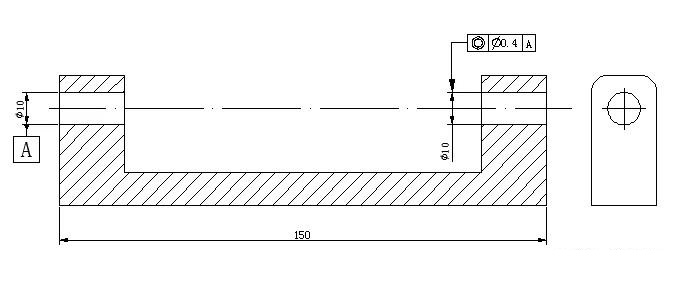
The figure shows a hinge structure, two holes have relative position requirements, the use of concentricity tolerance to constrain the relative position, whether the position of the two holes can be expressed correctly, let's look at the concentricity of the tolerance band:.
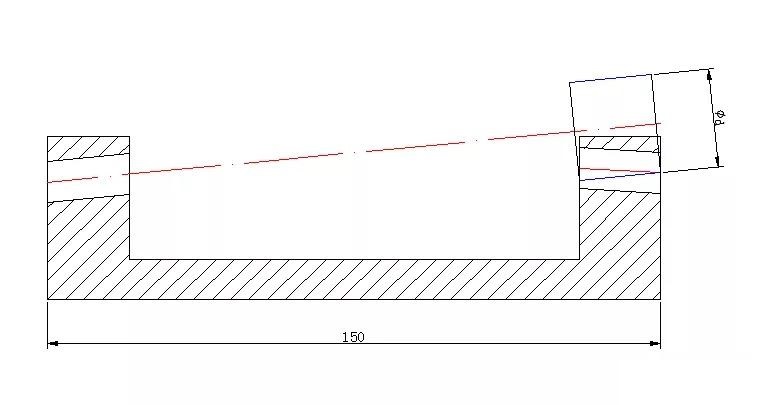
It can be found that when the position of the reference hole is not in the theoretically correct position, the concentricity value of the measured hole, Φd, is far more than its concentricity tolerance value, Φ0.4. This result is caused by the fact that the measured hole is too far away from the reference hole, and the concentricity needs to extend the axis of the reference hole to the position of the measured hole, and then evaluate the concentricity of the measured hole. At this time concentricity to evaluate the position of the two holes is no longer applicable, and it is necessary to use positional degree to evaluate:
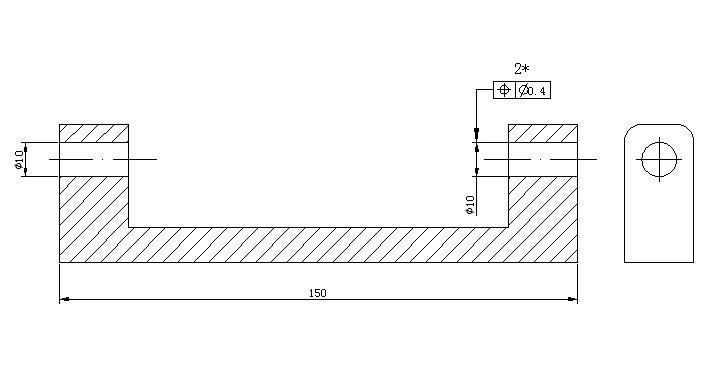
The diagram shows that the relative position of the two holes is Φ0.4. It should be explained that the reason why relative position is used instead of position with datum is that there is no sequence relationship between the two holes when they are used, i.e., it is possible to assemble the left hole or the right hole first, there is no need to stipulate that, and it does not matter which hole is used first in the actual use. The use of the position of the degree with a benchmark, it is necessary to do a single hole benchmark, the evaluation of the position of another hole, in this way, if the benchmark hole is very poor, it will result in the position of the degree of unqualified, but in fact the two holes of the relative position of the degree of conformity, because of the relative position of the degree of evaluation in the evaluation of each other for the evaluation of the benchmark.
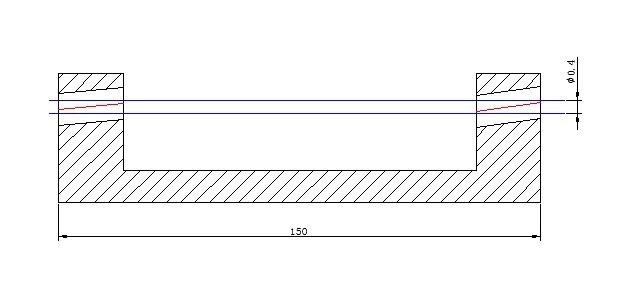
The tolerance zone shown in the figure is the tolerance zone of the relative position degree of the two small holes using the hinge. In fact, it is equivalent to the axes of the two small holes are located in a Φ0.4 cylindrical surface, then the relative position of the two small holes is qualified.
Through the above example, we will find that when two concentric elements which are far away from each other need to evaluate the relative position, concentricity is not applicable, and the use of relative positional degree can reflect the relative positional relationship of the two elements very well and will not cause misjudgment.
 Can Titanium Be Machined: Comprehensive analysis of CNC machining of titanium materialsNovember 10, 2023Greetings, machining enthusiasts! Have you ever wondered if titanium, that resilient and lightweight metal, can truly be harnessed through CNC machining? I'm here to not only answer your burning question but to delve into the intricacies, challenges, and best practices associated with machining titanium. As Richconn, your go-to precision machine shop, let's unlock the full potential of this extraordinary material together.view
 CNC Cutting Aluminum Sheets for Electronics EnclosuresFebruary 29, 2024Elevating Electronics Enclosures with CNC PrecisionIn today's fast-paced technological landscape, where precision and efficiency are critical, the manufacturing of electronics enclosures demands i...view
 Creating Precision: A Comprehensive Guide to CNC Machining PartsMay 31, 2024What are the CNC machining parts? How to select the most suitable CNC machining parts? Let’s find the answers with the help of this article!view
 About PVD Surface Treatment Technology and Its ApplicationSeptember 16, 2022With the rapid development of the automobile industry and the improvement of the technological level, especially the wide application of high-strength plates in automobile sheet metal, the cold work d...view
 Cleaning Machined Parts: A Comprehensive Guide to Elevate CNC Machining QualityNovember 13, 2023Welcome to Richconn, where precision meets perfection in CNC machining. In the world of machining, ensuring the cleanliness of machined parts is not just a step; it's a commitment to excellence.view
 Types And Characteristics Of FastenersOctober 24, 2023Screws the most common fasteners used to create removable threaded connections in household appliances, industrial equipment, transportation, building structures and other machines and mechanisms. Consider the varieties of bolts, the materials of construction, and the characteristics of their manufacture.view
 EN
EN
 ru
ru 
